Tips and Tricks
Adding and Removing Tracks
You can easily add and remove tracks in the Song Editor:
- Select a track.
- Optionally, use the multi-selection button to select more tracks.
- Remove the track(s) by tapping on the red '-' delete button.
- Add a track below the selected track(s) by selecting the grey '+' button. TAP to add an Obsidian instance, or TAP AND HOLD to choose any track type.

Changing a Track's Instrument
You can change the instrument on an existing track as follows:
- Tap on the Mixer button.

- In the Mixer, DOUBLE TAP on the track's title (at the bottom of the strip).

- Use the dropdown menu to choose the instrument type.

Grouping Tracks
It's often convenient to combine tracks under a single group track in order to apply effects to the entire group rather than each track individually:
- In the Song Editor, TAP the multi-selection button.
- Select the tracks you wish to group together.
- TAP AND HOLD on the grey '+' button.
- Select Group Selected Tracks from the menu.
- The Group track is inserted above the selected tracks, with a vertical bar indicator to indicate which tracks are grouped.

Creating a Send Effects Track
A useful feature is to re-use effects across multiple tracks.
This has a host of benefits including saving processing, keeping projects organized and allowing for a variety of creative effects with precise control over uneffected (dry) and effected (wet) signals.
Here are the steps to implement a typical Send effects track setup:
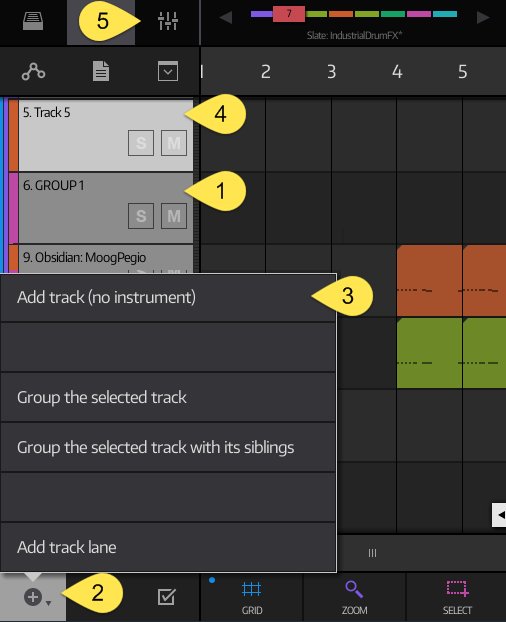
- Select a track. The Send effects track will be inserted above or below this track, so choose a track that makes the most organizational sense.
- TAP AND HOLD on the grey '+' button to invoke the track insert menu.
- Select Add Track (no instrument).
- An empty track will be inserted below the track you selected in step 1. If you wish, use TAP AND HOLD on the Track Header and DRAG VERTICALLY to move it.
- With the empty track selected, tap the mixer button on the Status Bar.
- In the Mixer, tap the SEND button on the track you wish to send from. In this example, we will send audio from the 'GROUP1' track to the empty track we created called 'Track 5'.


- In the mixer's SEND page, tap on ADD AUDIO SEND and choose the track you wish to send to.
In this example, select 'Track 5'.

- Optionally, select PRE so that the signal is sent before the track's fader/pan controls are applied to it. This means that the signal will still be sent even if you lower the track's fader completely to silence its output.
- Adjust the level of the signal being sent (particularly useful when controlling the amount being sent to a 100% wet reverb track).
- Tap on the send's DEST button to quickly move to the track the send goes to (in our example, this is 'Track 5').

- Tap on the AUDIO FX tab button to set up the send effects.
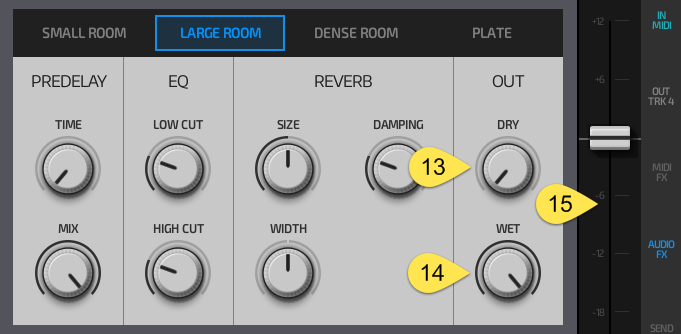
- A typical use is sending to a reverb track, so we'll select the 'Algoverb' effect here.

- For send effects, we usually want to have only the wet signal (we can control the dry amount using the fader of the track sending the dry signal) so set Algoverb's DRY control to its minimum value.
- Again, since we only want the wet signal, set Algoverb's WET control to its maximum value.
- We can now control the amount of reverb using track fader on the right. (Note: some screen sizes don't have room for the track fader on this page - you will have to return to the main mixing desk view).

Repeat steps 6-9 for other tracks that you might want to send to the send effects track.
Modulation Routing in Obsidian
One of the key features of the Obsidian synthesizer/sampler is its quick and flexible modulation routing options.
This brief tutorial will show you how to wire up a quick 'wobble bass' sound using this intuitive routing system:
- Choose an Obsidian instrument, tap on the PATCH tab button and tap the patch list's HAMBURGER BUTTON.
- Choose the Init item to create a blank patch.

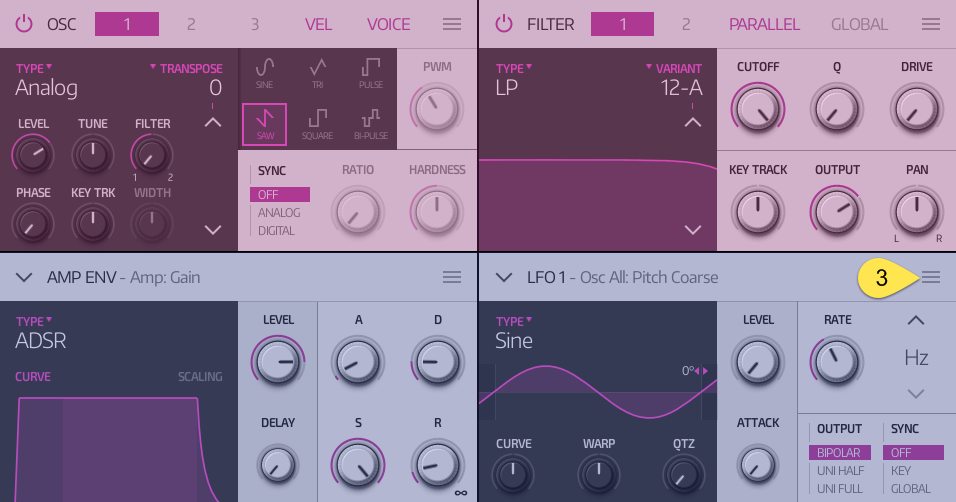
- The ENV and LFO outputs in the bottom two panels (highlighted in purple) can be routed to almost any OSC or FILTER control in the top two panels (highlighted in magenta). In this example, we'll use LFO 1 to modulate FILTER 1's cutoff.
TAP on LFO 1's HAMBURGER BUTTON.

- Choose the Edit dest item to bring up a list of destinations that LFO 1 modulates (note: if LFO 1 isn't currently routed to anything then this item will instead be named Add dest).
- By default, LFO 1 modulates the global pitch parameter. Tap the red '-' button to remove this modulation connection.
- Tap the '+' button to add a new control to route the LFO to.


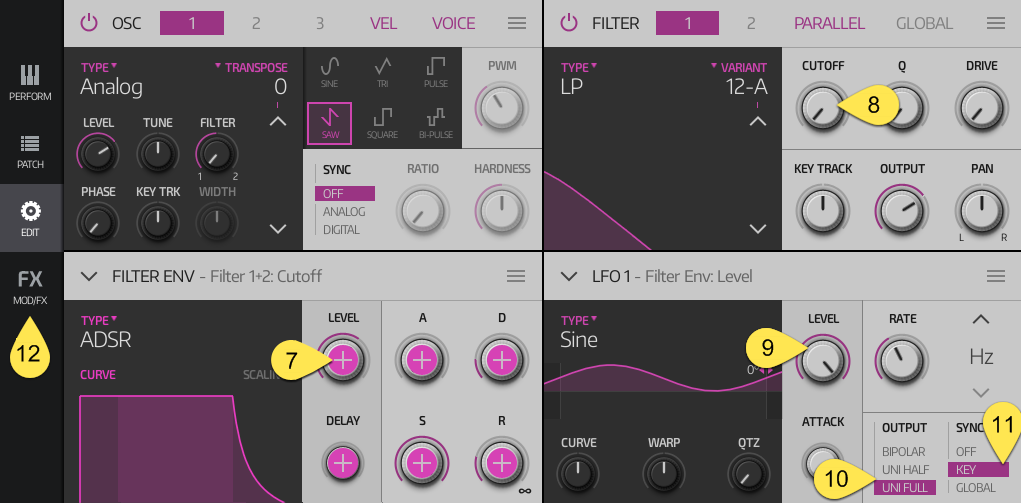
- By default, the FILTER ENV is routed to FILTER 1's cutoff. It's easier to just have LFO 1 modulate the FILTER ENV LEVEL control rather than the FILTER 1 cutoff directly. Tap on the FILTER ENV's LEVEL control and the modulation connection is now made!
- Now that the FILTER ENV level controls the cutoff, set FILTER 1's CUTOFF control to zero.
- Increase LFO 1's LEVEL control for maximum effect.
- Set LFO 1's OUTPUT option to UNI FULL so it can only add to the FILTER ENV's LEVEL.
- Set LFO 1's SYNC option to KEY to make the LFO start its cycle from the beginning when a note is played.
- Remember that you can also view and manage all modulation connections in Obsidian's MOD list.

When you press a key, it should now apply a modulating 'wobble' effect to the FILTER 1 cutoff. Experiment with the 'RATE' knob under LFO 1 to increase or decrease the effect.
Setting up Sidechain Compression
The NS2 Compressor supports sidechain input. This allows an external audio source sent from another track to act as the input upon which the compressor acts.
One of the most common uses for this effect is the 'pumping' or 'breathing' effect you hear in many electronic music tracks. The following is a quick guide to setting this up:
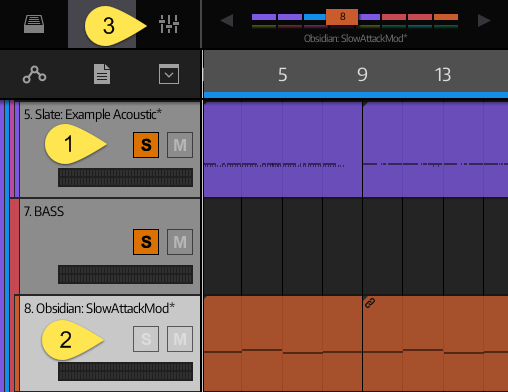
- To set up the pumping effect, we'll want to send the kick drum signal from our drum track to a bass, lead, pad or fx instrument. Start by identifying the track that will contain the kick drum input. Here we identified the 'Example Acoustic' drum track.
- Identify the track you want to have the pumping effect. Here we identified, and selected, the 'SlowAttackMod' bass track.
- With the destination track selected, tap on the mixer button.
- Tap on AUDIO FX for the destination track.


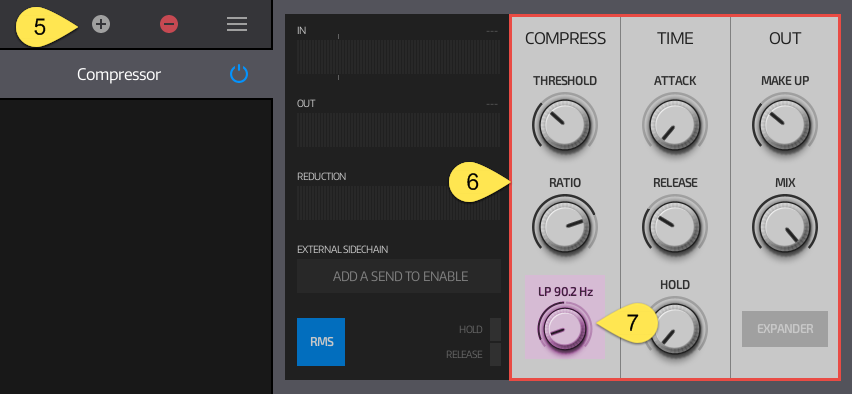
- Add a compressor effect.
- Set the compressor for a low threshold and high ratio to ensure you hear the effect properly. Use its reduction meter to understand the amount of work it's doing.
- Lower the compressor's SC FILTER to lowpass only the bass frequencies of the incoming signal. Note: if there are bass sounds other than the kick drum, such as toms, you may want to lower this setting further. If that doesn't provide good results you can simply create another fresh track with just a kick drum to create the effect instead.

- Go back to the mixer and tap send on the source (drum) track.
- Tap on ADD AUDIO SEND.
- Choose the destination track's Compressor sidechain. You now made the connection from the drum track to the bass track's compressor side chain!


Go back to the compressor and adjust the settings to modify the effect. If you want real rhythmic pumping, play around with the compressor's HOLD and RELEASE values to suit the song's tempo.
Quick Zooming in Editors
Although the Song, Part, Sample and Automation Editors all support traditional pinch zooming, it's usually not the fastest or most accurate way to zoom when you have a specific task in mind. A better way to work is as follows:
- With the editor's view zoomed out, make a rough selection of the area you want by TAPPING on an item or DRAGGING a selection rectangle using one finger in the editing window.
- DOUBLE TAP the editor's ZOOM command button (at the bottom of the editor).


- The viewport will zoom into the highlighted selection.

DOUBLE TAP ZOOM at any time to toggle between the selected area and a fully zoomed out view.
Quick Part Mute in Song Editor
- Select the parts you wish to mute in the Song Editor's Editing Window.
- Double-tap the PROPERTIES command button (at the bottom of the Song Editor).
- All selected parts will be muted. Double-tap the PROPERTIES command button again to toggle mute on or off.


Quick Loop to Selection
When working on a selection of parts in the Song Editor, it's often useful to set the song's loop points to the region you're working on.
- Select the parts you wish to include in the loop using the Song Editor's Editing Window.

- Double-tap the ACTIONS command button (at the bottom of the Song Editor).

- The blue loop indicator will now shift to the selection's time range, and song looping will be automatically enabled if necessary.

The Part Editor has a similar function. Double-tap its ACTIONS command button to set the song loop to the part's time extents.
Undo and Redo Actions
- Undo the last action by TAPPING the left button on the Status Bar.
- Redo the last undo action by TAPPING the right button on the Status Bar.
- Access the full list of history actions by TAPPING AND HOLDING either button.

Quantizing Notes
By default NS2 quantizes all notes in real-time as it records. You can re-quantize the notes after they've been recorded by following these steps:
- For the purpose of this tutorial, we'll turn off real-time quantization to deliberately allow looser note timing when real-time recording. Begin by tapping the Status Bar's Song Position Indicator to invoke the Song Settings Dropdown.
- Tap on the RECORD tab button to show the RECORD settings. Note: you can alternatively TAP AND HOLD on the Status Bar's RECORD button to get straight to the record dropdown.
- Set REAL TIME QUANTIZE to OFF.

- Record a part and double-tap it to enter the Part Editor. Notice how the notes do not line up perfectly with the quantization grid. Select all of the notes you wish to snap to the grid with quantization.
- Optionally, enable the grid by tapping the GRID command button and select the note interval that best suits the part.
- Tap on the ACTIONS command button and choose QUANTIZE.

- Select USE GRID to quantize the notes according to the grid setting in step 5, or alternatively choose a different note interval.
- You will see a preview of where the notes will shift before committing the quantization - red notes are those the furthest away from the quantize interval, and green notes are ones which are already close to the interval. Once you're happy, tap the QUANTIZE button.

Using Track Lanes
NS2 is flexible in how it allows you to record and manage separate 'lanes' of parts within a single track.
Here's a brief overview on managing track lanes according to your preference:
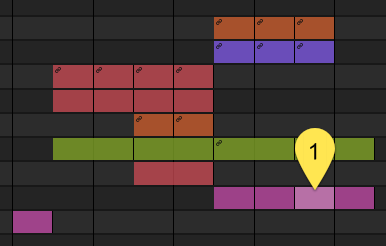
- The Song Editor allows you to shift parts so that they overlap other parts. When you do this, it will automatically create a new lane within the same track, shown here in highlight.
- Alternatively, you can add permanent extra lanes to any track. This is particularly useful when layering multiple recorded parts of a single instrument (eg. a separate lane for hi-hats on a Slate instrument). TAP AND HOLD on the ADD TRACK button in the bottom left corner and select Add track lane from the list of options.


- Drag and move the previously highlighted lanes from step 1 into the newly created track lane.
- By default, the sequencer will automatically record to the first lane of the track. You can set this to a different lane by enabling its RECORD TO THIS LANE option.

Recording Automation in Real-Time
You can record automation in real-time for:
- Mixer strip volume and pan
- Mixer send volume and pad
- Instrument macro controls
- Most effects
Here's an example of how to do it in Obsidian:
- Go to Obsidian's PERFORM page and tap the RECORD button on the Status Bar.
- Whilst recording, modify any macro control to record your movements as automation. A red dot next to the control indicates that the control's movements will be recorded. When not recording, a green dot indicates automation has been recorded for a control.
- The green dot also indicates recorded automation for the X/Y pad as well.

- Back in the Song Editor, the parts containing your recorded automation will show the name of the automated control(s). You may have to zoom in a little if you have a lots of tracks.

- From the Song Editor, DOUBLE TAP on the part to open the Part Editor and then tap on the Automation Button to open the Automation Editor.
- Select the automation parameter you wish to view or adjust using the Parameter List.
- Edit the recorded event data by adjusting the points in the Editing Window.

- Use the Automation Editor's command buttons to assist with your selection and editing.


